Sunday 7 December 2014

Final Cinematic

So today I had my final presentation where I showed my environment to the class - I went through alot of what I went through on my previous posts in this blog.

I hope you enjoy the video!


Finalised screenshots of 'Murder in France'

So after 3 months I have finished my project and I am quite happy with it, I will continue working on the props as I need a lot of time to polish them!

I hope you enjoy the screenshots.


Saturday 6 December 2014

Decals and other small details

Now that I had the lighting nailed down I wanted to create some minor but subtle effects to the environment so I decided to add some decals onto the walls as they looked a bit plain. Along with some blood splats.

Making decals in UE4 is very simple I will explain how I made them here:


Making sure your canvas size is 1024 x 1024 (or by the power of 2) I added a piece of dirt and nothing else around it.


I then colour pick the colour of the dirt, make a new layer below the original one and alt+backspace to fill it. Then Shift click the layer icon with the piece of dirt, go into channels properties and click save selection as channel which will create an alpha channel, now just save it as a TGA and go into UE4.

Then I imported the texture into UE4 right clicked it and selected create material - I then made the material a deffered decal and put the alpha into opacity, and bam done :) easy!


Moonlight god rays re adjusting the lighting

After posting lots of my photos onto Facebook lots of my friends commented with feedback - I had gotten alot from Ashley Thudnercliffe, Damon Sloane and Edvinas Petrauskas - they suggested some really cool ideas, some of them where that because my scene was very orange due to the candle lights adding some blue lights coming through the windows would give it some really cool effects aswell as showing moonlight, also blue compliments orange very well.

So the problems I was getting was that light was coming in from both windows when the moon waas only meant to shine on one side of the environment - here the green line shows that lights are coming in through both windows.

Here are some references I tryed to replicate:

http://static5.gamespot.com/uploads/original/536/5360430/2561072-lotf_om_infested_fight.jpg


http://4.bp.blogspot.com/-Ff_23EtL_4E/UXSVtkSsXEI/AAAAAAAAAFw/SUNBlifF06s/s400/Amnesia+2013-04-21+20-33-56-24.png
http://img3.wikia.nocookie.net/__cb20131103010319/amnesia/images/7/78/Amnesia_Archives.jpg


Deleting the lights I had outside made for a more dynamic piece and more realistic as show below.


As you can also see I put candles on the sides of the room and turned on all of the chandeliers as alot of people were complaining the scene was way to dark which I completely agree with. So made some major changes.

The body bag hanging Marvelous Designer

I am now onto making the main asset of the main murder room!

So my main idea for this was to create a body bag hanging from the ceiling I researched as much as I could and found a few very good references:

(REFERENCES)
http://www.kazperstan.co.uk/lastofus.html
http://photos1.blogger.com/blogger/7397/1962/320/sept%205,%202006%20018.jpg

I first tryed to create the body bag in mMya but realised it would be alot quicker, efficient and alot more realistic if I made it in Marvelous Designer (used trial version). I simply made 4 rectangles for the main peice of the cloth so it would zip up like a body bag then 2 squares for the head and the feet, I then created elastic bands around the feet, middle and head, to make it look like it was tightened by rope.

I created the rope in maya using curve tools and unifyed unwrapped it.


So here is the finalised body bag - the cloth was a material I made in UE4 which I also used for the other bits of cloth in the scene. The blood was added in photoshop using some stained blood photos taken from google and other sites.

Friday 28 November 2014

Creating high poly assets

So now I have already begun the process of high polying my models, here I will go the process of how I went about this.

I got a few references of console tables that were used in the Louis XIV  period, one for the back of the room and one for the middle of the room as the stage highlight asset.


What went right:
I managed to bake out the normal maps pretty well and making the high polies were pretty simple as the only detailed parts where the legs, on both assets.

What went wrong:
I tweaked around with different woods and granite to get the best feel of the tables, still tweaking them now!

How can I improve:
Well now I know the best work flow of making tables, so working faster is my next step.


making the high poly of the leg I left the bottom bit square and alone as I would add details to this bit later using Ndo. This would save me time.


Candle Light

The candles make up the majority of lighting in my scene so I needed to nail these down properly.

I had a few candles in my main room to make this candle effect I needed to use a particle emitter, it moves my flame in a random rotation and flickers like a normal candle light would.

A problem I came across and still have is that when I move the camera off the flame, the light turns off, I have tried increasing the bounding box of the flame, but that still hasn't worked, problem is shown below.

Will try to fix this later on.


Making the wax was pretty easy, was simply taking a cylinder into ZBrush and moving the top verts and then subdividing and adding clay tubes down the side, then smoothing the inner groves.
I would add wax dripping down from the metal candle holder but due to time, I could not.

Rain on windows

I have been working on a water shader for my windows to make the hallway seem a bit more dynamic and believable


This is still a wip, and I would probably need to add some sort of condensation on the inside of the windows.

Here is how I managed to do this effect.


What I basically did was get two different water droplet textures, I got a reference off google, put it into photoshop and painted white on the water drop lets, made the texture seamless, then created a normal map out of the white/black texture mask.

I then went into UE4 and created several nodes, the most important nodes would of been the time, and panner nodes, these made the water fall down and different times since I had two variations of water drop lets.


Some more main room ideas


So again I've changed the ideas of my main room, my thoughts are having 2 pieces of cloth with heraldic signs on them, which you can see on the right of the first picture.

I've also tipped the chairs in the room to make it look like something has occurred again in the room, also needed to do it to spread out the props and add more of them into the room.

I've also added a chair and frame in the corner which I am planning to put a cloth over, as if its being protected from dust, I will also redo the fireplace as that was only a place holder.

Will also probably add more assets to the backs of the wall, to make it look less bare.


As you can see I've added some particle effects (flames) I will talk about this in a later post in my blog.

Masking variations of tileable floor

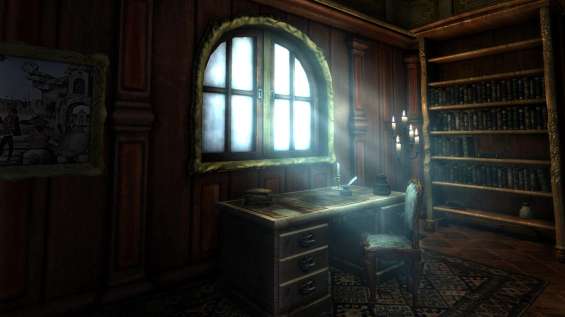
I have been using UE4's preset floor, but now I wanted to give it a go and try my own floor, here is my process of how I went about making my floor.


So to create my Versailles floorboard I looked at some references first, I used this one as I could easily see the crisscross sections.

I then went into Maya and started building the different sections the cut faces tool was very useful here as I could put faces on the squares in a straight line. Then delete those polys later to make it look like the wood was intersecting.


Then I gave each wooden piece a different colour in Maya so it would be easier later on when it came to baking and texturing.

I then made the high poly of the shape which was pretty much turbosmoothing and adding edge loops to the hard surfaces. I then placed a plane on the bottom to bake the high poly onto. I baked the normal maps, cavity and colour map.


I then used these colour maps in Photoshop to easily mask out the generic wooden texture I used for the texture, then rotate the wood to make it look like it was going one way.

Here I made 3 different variations so I could paint in Unreal different colours to make the floor look less repetitive. 


Here is the normal map, I made sure that certain points were popping out and others weren't.


Here are the nodes I used for the floor, to make them tileable and less repetitive and also to rotate them as they were meant to be in a diamond shape